
How to Stop Pulling the Golf Ball: Causes, Drills, and a 4-Week Fix
A pull starts left and flies straight left, which means an out-to-in path with a matched face. What drives that combination, the drills, and a 4-week plan.
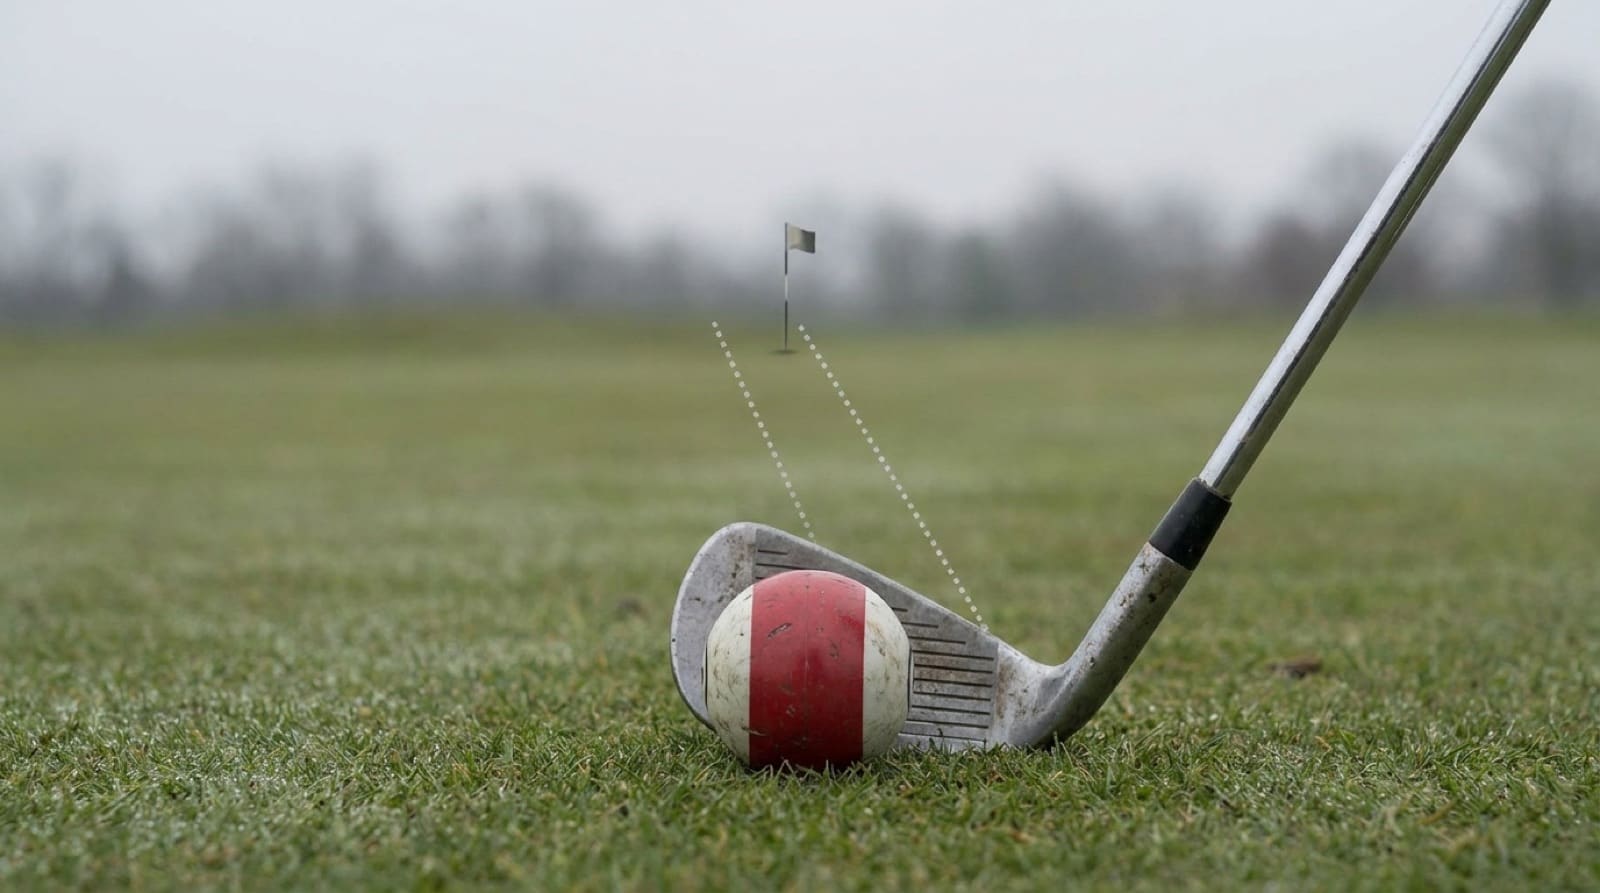
Quick answer
A pull starts left and flies straight left, which means your swing path and clubface are both aimed left and matched at impact, almost always from an out-to-in, over-the-top move. Because the face already matches the path, a pull is the one common miss you fix path and aim first, then square the face, then rehearse under random practice. Check your alignment before anything else, since an aimed-left setup pulls the ball on its own.
Pull diagnostic — find your pattern, then your fix
| Type of pull | Ball flight | Most likely cause | Highest-leverage first fix |
|---|---|---|---|
| Straight pull | Starts left, flies straight left | Out-to-in path with the face matched to it, often aimed left | Check alignment; neutralize the path |
| Pull-hook | Starts left, curves further left | Face closed to the path: strong grip, bowed lead wrist, or a flip | Ease the grip; keep rotating (see the hook fix) |
| Pull-slice / pull-fade | Starts left, curves back right | Severe out-to-in path with the face open to that path | Shallow the path first, then square the face |
| Speed-only pull | Straight pull easy, hook under speed | Sequence breaks down; upper body spins out and hands take over | Tempo and sequence work; a lesson if it persists |
| Push (the opposite miss) | Starts right of target | In-to-out path with the face matched right, or aimed right | Different fault; check aim and path direction |
Read your own pull in three swings
You do not need a launch monitor to know why the ball goes left. Modern ball-flight laws say the ball starts close to where the face points and curves away from the path, so start line and curve reverse-engineer your impact for you.
- Lay an alignment stick on the ground aimed at a target, then step back and check where your feet and shoulders actually point. If the body line aims left of the stick, you found your pull without swinging.
- Hit three shots and watch the start line. The ball starts roughly where the face pointed. A pull confirms the face was left at impact.
- Watch the curve. Straight left is a matched face and path, the classic pull. Curving further left is a pull-hook, a face problem. Curving back right is a pull-slice, an over-the-top path problem with an open face.
Why a pull starts with the path
A pull and a slice feel like opposites, and golfers treat them that way, but they usually grow from the same root: an out-to-in swing path. GOLFTEC, the largest swing-data teaching network, ties both misses to opening the shoulders and hips too early in the downswing, which tilts the club across the ball to the left. When the face stays open to that leftward path you get a slice. When the face matches the path, the curve disappears and the same swing produces a dead-straight pull. The path is the shared cause; the face angle decides which miss you see.
That is why the fix order flips. On a slice, the face is open to the path, so you close the gap by fixing the face first. A straight pull has no gap to close, because the face already matches the path. TrackMan defines that matched condition precisely: when face angle and club path share the same value, the ball flies straight in that direction, even when both are pointed away from the target. So the leverage on a pull is where that matched pair is aimed: move the path and your alignment back to the right, and the pull follows.
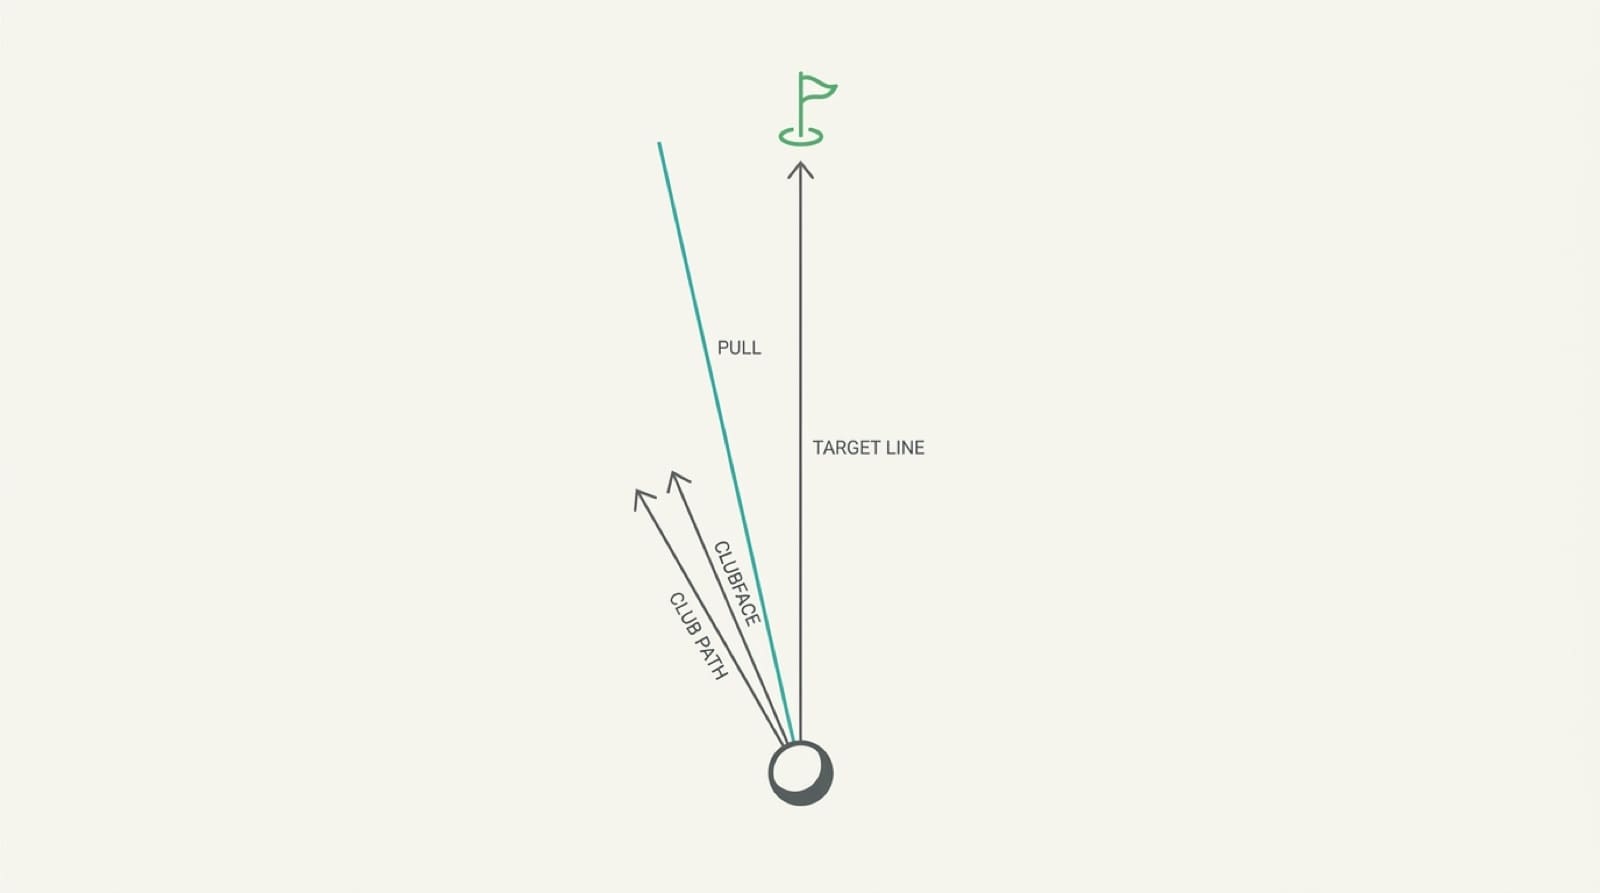
The clubface still sets the start line. TrackMan lists face angle as the primary driver of where the ball launches, and modern launch-monitor data puts the face at roughly three-quarters of your start direction on a mid-iron, more with the driver. So a ball that reliably starts left tells you the face was left at impact. The question the curve answers is whether the path was matched to it. Straight flight means matched, and matched-and-left is the definition of a pull. FlightScope frames the correction the same way: a square face to a square path produces a straight shot at the target, so the goal is to walk both numbers back toward zero relative to the target line.
The fix order: path and aim, then face, then transfer
The sequence that works for a pull reverses the slice fix.
- Path and aim first. A straight pull is a leftward path aimed left, so start there. Confirm your alignment is not pre-set left, then groove a more in-to-out path. GolfWRX’s breakdown of the new ball-flight laws warns that misreading this is how golfers make it worse: swinging even further left to “pull it back” only sends the ball more left. You want the path moving out to the right.
- Face second. Once the path is neutral, the ball will start right of where it used to, and you retrain the face to square to the new path. For most players that is a matter of feel and reps. If your pull curved further left into a pull-hook, the face is closing too hard, and the grip and release fixes from the hook protocol apply directly.
- Transfer third. Drilling the same shot on the range makes everything look fixed by rep 20. It does not survive the first tee unless the last phase of practice is random, with rotating clubs and targets. The research on block versus random practice is the reason this step is not optional.
Setup sits underneath all three. A ball played too far forward, a stance aimed left, or shoulders that open early at address all bake a leftward path into your swing before you move the club, which is why the diagnostic above and the Common mistakes section both flag alignment first.
Five drills that actually move the needle
Most golfers who pull already know one or two of these. The ones who fix it run them in order, set each goal around a 65 to 70% hit rate (the challenge point where a drill teaches most, covered in block vs random practice), and re-test against video.
1. The alignment check (setup fix, do this first)
Lay one alignment stick on the ground pointing at your target and a second across your toes, parallel to the first. Step back. For a right-hander fighting a pull, the toe line, hips, and shoulders should run parallel to the target line, not left of it. GOLFTEC treats an early-opening, left-aimed setup as a primary source of the out-to-in path. Many pulls disappear the moment the body stops aiming left. Fix this before you touch the swing.
2. The headcover gate (path fix)
From the same GOLFTEC over-the-top breakdown. Set a headcover or a soft object a few inches outside the ball and slightly ahead, so an out-to-in path clips it and an in-to-out path misses it. Pair it with a staggered stance, trail foot dropped back, which makes it easier to swing to the inside. Start slow off a tee. Goal: 8 of 10 mid-irons that miss the headcover and start right of the target.
3. The “swing to right field” rod drill (path and sequence)
Borrowed from long-drive sequencing work and shown in this over-the-top fix. Set an alignment rod on the ground pointing to about 4:30 relative to the target, and feel like you are hitting the ball out to right field for a right-hander. Keep some side bend so the club shallows and swings from the inside instead of over the top. The ball may start hard right at first while the face catches up. That is the drill working, not a new miss.
4. The Pete Cowen pump-down drill (transition)
From this pull-specific lesson, which attributes the move to coach Pete Cowen. Take the club to the top, then pump the arms straight down toward the ground two or three times while your chest stays quiet and closed, feeling the arms drop into the slot before the body rotates. The whole point is to stop the upper body from throwing the club out and over the top, which is the engine behind the pull. Then hit the shot from that dropped-in feel.
5. The square-the-face check (face fix)
Once the path is neutral, the ball starts right, and you square the face to the new path. Hit half-swing 9-to-3 wedges and watch the start line settle back on target. If the ball is now curving left, your grip is closing the face too hard: check that you see only one or two knuckles on the lead hand and keep your chest turning through impact so the hands cannot flip. George Gankas calls the clubface the number one cause of an over-closing face, whether it comes from grip, address, or a stall-and-flip release.
Play smart until the pull is gone
The swing fix takes weeks. Your scorecard does not have to wait. A pull hurts most when it turns a fairway into a penalty, so manage the miss while you retrain it.
Arccos coach Ryan Crysler puts the tour’s average driver dispersion at about 60 yards of total spread, and notes amateur dispersion runs wider. His practical rule is to aim at least 60 yards clear of any hazard so your normal spread has room to happen without a penalty. Applied to a pull, that means aiming your start line at the safe right edge of the fairway, giving the leftward miss somewhere harmless to go. Mark Broadie’s Every Shot Counts is the reason this matters more than it sounds: distance off the tee lowers scores as long as it does not add penalty strokes, so a pull that stays in play costs a fraction of a shot, while the same pull in the water or out of bounds costs a full stroke and a distance penalty. Keep the ball in play now, fix the path over the next month.
Crysler’s practice test travels well here too: hit 10 balls to a target with each club, moving between stations to change the angle, and track how many finish in a playable spot. It gives you an honest dispersion number instead of a memory of your best swing.
The four-week protocol that makes it stick
Drills work in week one and quietly stop working by week four, because the change never meets variable conditions. This protocol mirrors the howTo on this page, and PracticeCaddie’s AI planner can bias a plan toward the miss you flag so a pull gets more path-and-aim work than a generic session.
- Week 0 — measure. Phone video down-the-line. Five 7-irons, five drivers. Record start direction, whether the ball curves, and where your feet and shoulders actually aim. No fix yet.
- Week 1 — path and aim. 30 minutes, three sessions. Alignment check every set, then the headcover gate off a tee with mid-irons, then the right-field rod drill. Block practice is right here, because you are acquiring a new path. No driver yet.
- Week 2 — face. 30 minutes, three sessions. Pump-down drill into half-swing 9-to-3 wedges to square the face to the new path, then add driver. Re-film at week’s end: the start line should move right and any left curve should shrink.
- Week 3 — random. 45 minutes, three sessions. A pre-written 18-shot list rotating club and target, no two consecutive shots the same, applying the path and face feels on every swing. This is the phase that makes the fix transfer, per the block versus random research.
- Week 4 — pressure. 45 minutes, three sessions. Each session ends with three first-tee simulations, one swing each, fairway-or-bust. Play one nine-hole round and record your pull rate.
- Maintenance. Re-film every two weeks for two months. The out-to-in path tries to return under pressure; honest measurement is the only reliable counter.
When to skip the protocol and book a lesson
Self-coaching handles the common “aimed left plus over-the-top” pull. Three patterns are faster to fix with a one-hour TrackMan or FlightScope lesson:
- A pull that becomes a hook under speed. A change that holds at 80% and breaks at 100% is a sequencing problem, best diagnosed under load.
- A two-way miss with no consistent shape. If you pull one swing and push or block the next, the face-to-path relationship is unstable, and a launch monitor isolates the variable in one session.
- A pull that survived two prior self-fixes. The out-to-in pattern is grooved deep enough that supervised re-patterning beats another month of solo reps.
A single launch-monitor lesson can save weeks of guesswork in the cases where the diagnosis matters more than the drill.
Common mistakes
- Swinging further left to fix it. The most common self-inflicted wound. A pull already swings left, so more left makes it worse or flips it into a pull-slice. Aim the fix to the right.
- Ignoring alignment. A body pre-aimed left pulls the ball with a technically fine swing. Check the toe and shoulder lines before you rebuild anything.
- Fixing the face before the path. Squaring a face that already matches the path just changes the miss. Neutralize the path first, then square the face to it.
- Playing the ball too far forward. A forward ball position catches the club moving left after the low point. Move it back toward center for irons and re-test, since setup fixes are free.
- Block practice for four weeks. Fifty reps of the same shot makes the range look solved and the course look the same as ever. The week-3 random phase is non-negotiable.
Key takeaways
- A pull traces back to the path. The ball starts left and flies straight because the face and path are matched left, usually from an out-to-in, over-the-top move (GOLFTEC).
- Fix order flips versus a slice: path and aim first, then face, then transfer. A matched pull has no face-to-path gap to close, so the leverage is aiming that pair back to the right.
- Check alignment before you swing. A setup aimed left pulls the ball on its own and is the fastest fix on the list.
- The face still sets the start line. TrackMan puts the clubface at the majority of start direction, so a left start means a left face.
- Straight left is a pull, further left is a pull-hook, back-right is a pull-slice. The curve tells you whether to attack path, grip, or both.
- Manage the miss while you fix it. Aim your start line at the safe edge and keep the ball in play; a penalty stroke costs far more than a pull that finds the short rough (Arccos).
- Four weeks of structured practice — path, face, then random and pressure — is what makes the fix hold on the course.
Frequently asked questions
What causes a pull in golf?
A pull happens when your swing path and clubface both point left of the target at impact and match each other, so the ball starts left and flies straight left with no curve. For most right-handed amateurs the root is an out-to-in, over-the-top path that drags the club across the ball to the left. A setup aimed left of target, a ball played too far forward, and an upper body that spins out early all feed the same leftward path.
Should I fix my swing path or my clubface first to stop pulling?
Fix the path and your aim first, which is the opposite order from a slice. A straight pull already has the face matched to the path, so there is no face-to-path gap to close. The leverage is in moving that matched pair back to the right: check your alignment, then groove a more in-to-out path so the ball starts right of the target. Once the path is neutral, square the face to it. Reverse the order and swinging left with a shut face only deepens the pull.
What is the difference between a pull, a pull-hook, and a pull-slice?
All three start left because the face points left at impact, but the curve tells you the face-to-path relationship. A straight pull flies straight left, so the face is matched to a leftward path. A pull-hook starts left and curves further left, so the face is closed relative to the path, usually from a strong grip or a flip. A pull-slice starts left and curves back right, so the path is severely out-to-in while the face stays open to it, which is really an over-the-top slice pattern.
Why does my pull turn into a hook when I swing harder?
Speed exposes sequence. At an easy tempo your body and arms stay synced, and the face arrives roughly matched to a leftward path, so you get a straight pull. Swing hard and the upper body tends to spin out earlier while the hands take over and snap the face shut, which tilts the spin axis left and curves the ball. A pull that stays a pull is a path-and-aim problem you can self-fix; a pull that becomes a hook under speed is a sequencing problem, and that is the pattern worth a launch-monitor lesson.
Does ball position cause a pull?
It can. Play the ball too far forward in your stance and the clubhead has already passed the low point and started moving left along its arc when it meets the ball, so even a decent swing sends the shot left. It is one of the quickest pulls to fix because it lives entirely in setup. Move the ball back toward center for irons, check it against a fixed reference like your lead heel, and re-test before you change anything in the swing itself.
How long does it take to stop pulling the golf ball?
It varies by player, and no study pins an exact number. If the cause is aim or ball position, you can see change in a session because setup fixes are immediate. A grooved out-to-in path takes longer, usually several weeks of structured practice at two to three sessions a week, and full retraining a couple of months, because the new path only holds under random, variable practice rather than repeated reps of one shot. A pull that survives a structured month under speed points to a sequencing issue worth a lesson.
Related reading
- Golf Ball Flight Laws: Why the Ball Starts and Curves Where It Does — the diagnostic hub for every miss; read your start line and curve to reverse-engineer the face and path behind a pull.
- How to Fix an Over-the-Top Golf Swing — the out-to-in path that causes most pulls; a path-first, 4-week reroute built on lower-body and shallowing drills.
- How to Fix a Slice in Golf — the same out-to-in path with an open face; if your pull curves back right, it is really a slice, and this is the fix.
- How to Fix a Hook in Golf — if your pull curves further left into a pull-hook, the face is closing too hard, and the grip and release work here applies.
- How to Aim in Golf: Alignment and Aim for Every Shot — the setup step that points the whole swing; an aimed-left body pulls the ball before you move the club.
- How to Grip a Golf Club — the cornerstone that controls the face; a strong grip is the usual reason a pull curves into a pull-hook.
- Golf Ball Position by Club — where the ball sits sets the low point; too far forward catches the club moving left and pulls the shot.
- Golf practice drills, organized by skill area — the companion drill library with setup steps and success criteria.